It can be aggravating to own a printer and not understand how to use its buttons. This essay was prepared specifically for you if you’ve faced similar difficulties. You’ll learn about the basic functions as well as how to set your Canon wifi password here. Take a look at some of the printer’s specifications first.
About the printer
- A simple, low-cost printer with smart connectivity
- With this cheap PIXMA printer, you can print crisp text and bright, borderless photos directly from your smartphone, Wi-Fi camera, or the cloud. The 3.8cm LCD display makes scanning and copying simple.
- Printing, scanning, and copying from a mobile device
- With the Canon PRINT app, AirPrint, and Mopria, you can print wirelessly from anywhere.
- This printer is practical and easy to maintain, with a stylish, robust design and a fingerprint and scratch resistant surface.
- XL cartridges that are cost-effective
- When compared to ordinary Canon ink cartridges, high-capacity Canon XL ink cartridges can save you up to 30% per page.
- The LCD screen and buttons are simple to operate.
- With the easy-to-use 3.8cm LCD screen, you can connect to your Smart device, check your settings, and troubleshoot.
- Photo printing with no borders
- Dye-based ink cartridges allow you to print borderless photographs up to 5×7″.
- UP TO 120 ADDITIONAL PAGES CAN BE PRINTED
- The Canon PIXMA TS3150 Series prints more than its closest competitor using inks included in the box.
What’s in the box, exactly?
- PIXMA TS3150 Series FINE Cartridges for all-in-one printers
- Setup CD-ROM for the power cord (CD only for Windows)
- Manuals and other written materials
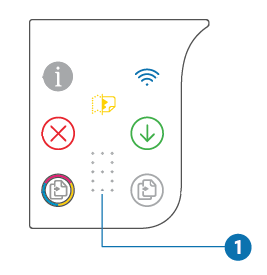
Operating panel
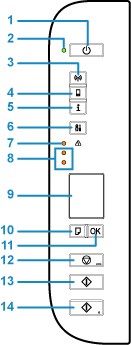
For demonstration purposes, all light on the operation panel are highlighted in the figure below.
(1) On/Off switch
Activates or deactivates the power. Make sure the document cover is closed before turning on the power.
(2) Turn on the lamp light
When the electricity is turned on, the lights flash.
(3) The Network button
Turn on/off the wireless LAN.
(4) Wireless Direct button
Is for activating/deactivating via the Direct button.
(5) information button
Prints information about network configurations.
(6) set-up switch
To perform printer maintenance and alter printer settings, select a menu. The segment display on the LCD is switched by repeatedly pressing this button.
(7) An alarm lamp
When an error occurs, lights or flashes appear.
(8) Ink lamps
When the ink runs down, the light flashes.
The upper lamp light represents the state of the black FINE cartridge, while the lower lamp indicates the status of the color FINE cartridge.
(9) LCD (Liquid Crystal Display):
Shows the number of copies, maintenance code, error code, and other icons.
(10) The Paper Selector
Select the printer’s paper size.
(11) The OK button
Completes the paper size selection process. This button can also be used to fix a problem.
(12) The stop button
To cancel operation, this button can be used to cancel an ongoing print, copy, or scan job. You can select maintenance options or printer settings by holding this button down.
(13) Black button
To start copying in black and white, you can also use this button to complete your setting item selection.
(14) Color button
To starts color copying, you can also use this button to complete your setting item selection.
* The Color and Black buttons are referred to as the “Start” or “OK” button in software applications and instructions.
LCD interpretation
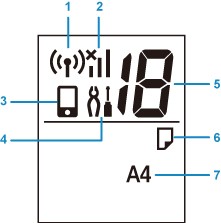
The LCD shows the number of copies, the maintenance code, the error code, and numerous icons.
(1) Status of the network
- When Wireless LAN is activated, this icon appears.
(2) Current network status
- Shows the current state of the network.
- Depending on the network in use or the network condition, the icon changes.
- (Signal strength: 81 percent or more): You can use the printer without any issues over a wireless LAN.
- (Signal strength: 51 percent or more): Depending on the network condition, a problem such as the printer not printing may arise. The printer should be placed close to the wireless router.
- (Signal strength: 50% or less): A problem such as the printer being unable to print may arise. Locate the printer in close proximity to the wireless router.
- The printer is not connected to the wireless router, despite the fact that wireless LAN is enabled.
(3) Direct:
- When Wireless Direct is activated, Direct appears.
(4) Setup
- Appears when the Setup button is pressed. Select a menu to perform printer maintenance and modify printer settings while this icon is active.
(5) Displaying segments
- The quantity of copies, maintenance code, or error code are displayed.
- The alphabet or a number from 0 to 19 is displayed.
(6) The status of the paper
- Appearance occurs when paper is loaded into the rear tray. This indicator also flashes when you hit the Paper Select button and select the paper size.
- If the paper mismatch detecting function is turned off, this icon will not appear.
(7) Size of the paper
- The current paper size is displayed. After pressing the Paper Select button, the paper size also illuminates as you select it.
On the Canon TS 3150 How to set a password.
The administrator password can be changed by following the instructions below.
Note of importance
At the moment of purchase, the password is set. The printer serial number serves as the password. The serial number of the printer is printed on a sticker that is connected to the printer. It is made up of nine alphanumeric characters (four alphabets followed by five numbers).
- To create a password
- The status of the printer is displayed on the web browser.
- Select the Security option.
- The menus are now visible.
- To continue choose the administration password to continue.
- Change the administrator password by selecting it.
- A registration confirmation message is displayed if the administrator password is not configured. Yes is the answer. Select OK when the notice appears again.
- Once you select your desired password click ok.
Note of importance
The password has the following character restrictions:
- Use 4 to 32 characters for the password.
- We recommend that you use 6 or more alphanumeric characters for security reasons.
Select OK when the finishing message appears.
Conclusion:
I hope that this has alleviated your concerns about the control panel and how to check or change your password. Remember to subscribe to the blog, as well as like and share the articles, so that others can benefit from them as well.